Top 10 WordPress Tweaks
Speed Optimisation
Top 10 WordPress Tweaks

The WordPress CMS (Content Management System) can be a lot to get your head around, especially for beginners. Prosperity Media have decided to make a list of the top 10 tweaks you may or may not know exist, or have not used in a while to brush up your webmaster skills.
How to Change the Number of Posts on a Page & Feed
To control how your blog is displayed to others, you can make changes to the reading settings which adjusts how your blog is viewed by others. You can access it via your Settings then Reading page on the WP Admin dashboard.
The default setting is 10 but it can be changed. Having more can potentially impact load times & therefore having less should decrease page load times.
Here is an example of the post change option:

Blog Page to Show
The syndication feed lets you display how many latest posts you want to be displayed in the RSS feed which you can then submit to aggregators, the URL of the feed is e.g. “example.com/feed/”.

How many articles to show in the feed
You can also select how long you want to posts to be in the feed, you can either show the full text or you can display 55 words to concise the post & allow users to read the full article to get more information.
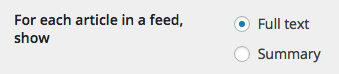
Article Summary in Feed
How To Change the WordPress Homepage
WordPress allows the webmaster to choose whether they want to display the latest posts from their website to display on the homepage or a separate page made specifically for the homepage. Here is how to switch between the two options:
- Log into the admin section of WordPress via wp-admin.
- Click the “Settings” menu item in the left sidebar to expand the “Settings” submenu & then click on the “Reading” tab.
- Once you are there then you have arrived on the page to make the changes. To make the front page display a page click on the radio button called “A static page” in the “Front Page Displays” options, from there you can use the drop down to select which page you would like to display on the front page.

Reading Settings
- To display simply select the “Your Latest Posts” radio button and your latest posts will display on the homepage.
- Save your changes at the bottom of the page & this will finalize changes you have made.

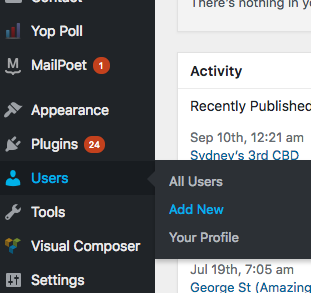
Change Admin Username in WordPress Backend
An important aspect of security for a WordPress CMS website is changing the default username. This is because there have been many attempted hackers trying to break into websites when the default username ‘admin’ has been used.
Here are the steps on how to change your username:
- Hover over “Users” & select “Add New”

Add New Screenshot
- Add in the “New User” information

Add User Screenshot
- Select the role selection as “Administrator”
- Then click the “Add New User” button & you’re done.
- You can now view your new “admin” user.
- Now log out of the existing account.
- Log in to the new account you just created.
- Now type in your new WordPress admin username and password and click Log In
- From the left-hand menu click on Users
- Delete the original admin account.*
- Now select your new account you create to attribute the old admin posts to it. (if you do not attribute posts they will be deleted).

You have now completed changing the username successfully.
*Always backup your database before making major changes to your website.
Use an Email instead of a Username on Login
Using email an can be just as good as using a unique username & sometimes it could even be better for security as emails are a lot harder to guess making the security stronger.
Screen Options Usage
The Screen Options menu is a section on the WordPress administration backend which is located on the top right corner of your blog on certain pages, allowing you to make changes to what you can see on the admin page.

Screen options
What it contains is a list of boxes which can be checked or unchecked which allows admins to show or hide different sections of an admin screen.
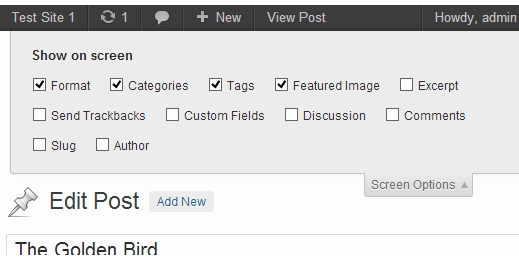
Screen Options example
These screen options give the admin a lot more control of what they are able to see & therefore can make you backend usage of the CMS a lot more productive seeing only the elemants you want to see on the page.
Image SEO
When performing Image SEO, it is all about ensuring your images can be easily crawled & indexed by the search engines such as Google. With web crawlers & algorithms improving every day, especially at detecting elements in images, the right plan moving forward is to ensure the image can be easy to find via search engines. Below we have listed several ways this can be archived:
- Use an image that matches your text description
- Name the image file appropriately
- Use the “alt” tag for the image with relevant text
- Ensure image dimensions match the image
- Use “srcset” tag wherever it’s feasible
- Compress image to smallest file size possible yet still viewable
- Add OpenGraph tag
- Add Twitter Card tag
- Align images to the centre or to the right for enhanced UX
- Insert image URLs in your sitemaps
Perfect word count on blog posts
Here is a guide on the word count of general blog posts & the sort of engagement you should expect depending on the length of the post from The Write Practice blog. A caveat is this guide is for established sites with traffic as sites with no traffic will not see any social shares or comments.
- Blog posts 75 to 300 words in length: Short posts at this length are most suited to creating a discussion focal point with the main disadvantage being the lack of social shares & poor on the SEO front.
- Blog posts 300 to 600 words in length: This is the standard length for an article or blog post as it is quite easy to write, requires minimal in-depth research to get your point across & is considered a great middle ground for gaining social shares & comments, with the drawback being it is not ideal for SEO as it may be to thin.
- Blog posts 750 words in length: This article length is ideal for getting shares & links as it is long enough to have substance but not too long to bore the audience, search engines favour this content when other websites do not provide anything more in-depth.
- Blog posts 1000 to 1500 words in length: Expect to get fewer comments as there will be fewer questions asked due to the content covering most basis of the topic at hand.
Text Widget Fundamentals
Here are a few great tips on how to use the text/HTML widget box which is a default widget plugin that comes installed with WordPress right out of the box.
- Adding HTML
According to the official WordPress support guide, the best practice for adding an HTML widget would be to use the custom box & place your desired content within the widget box as there is minimal risk to code breaking the website.
- Adding an Image
You can add an image to a widget using the custom widget (text) & used the “img src” HTML tag to insert any images you desire, you can then easily change the dimensions via HTML outputting your desired image.
- Adding a Video
There are two ways you could do this, one is to insert a video via the custom HTML text widget, but the second & more practical way is to insert the video into a video widget or a youtube video widget which you could easily download from the WordPress plugin library.
- Adding an Audio player
Similar to adding a video, you can insert an audio player by insert a HTML code into the text widget or you could download a audio playing widget such as the soundcloud widget from the wordpress plugin page.
Remove underscores & replace with dashes
This is used to improve both the SEO and the user experience of the website. This can be changed by going into the permalinks via the WordPress admin dashboard then to Settings and finally Permalinks.
Selected the option ‘custom structure’ & put this in /%postname%/
Then when you make a post ensure that dashes are used in the URL for the article.
Take underlines out of page links
WordPress has taken the advice of its community onboard & implemented some of the suggestions recommended. One of the major changes is the drop-down menu has moved to the top row of buttons while the horizontal rule and strikethrough buttons have moved to the second row.
The underline and justify buttons are no longer available in version 4.7 & above as sometimes the underlining text causes confusion due to the reader misinterpreting the underline for a link.
It is therefore recommended to update your WordPress blog to the latest version if you have not already done so to ensure you are experiencing the best backend WordPress has to offer.
Here are some before & after screenshots of the text editor backend:
Before (with underline button)

WordPress Before
After (Without underline button)
WordPress After
It is now also easier to find out what button does what with a shortcut describing what each button does opos up when you hover over it ensuring the best user experience of the CMS.
Final remarks
And that is a wrap, I hope you enjoyed the tips & learned something new to add to your WordPress repertoire. These tips should keep your WordPress website secure & ensure you have a few additional productivity hacks to add to your knowledge basket.
Another great tip as an added bonus makes sure to update your WordPress website regularly, ensuring you have backed up the website in the process just in case there are any unforeseen errors or compatibility issues.
Which tip did you like the most? Feel free to like comment or share any feedback or additional tips you may have.